Well on a Unix-based OS, it's pretty much just as easy, right out of the box. But thanks to great open-source software like Xming, it's just as easy from windows too.
Before we get started we will have to download and install Xming. You can download Xming directly from the project's download page on SourceForge. For starters, download the xming, xming-fonts and xming-tools-and-clients packages. The Xming and Xming-fonts packages download as executable's, so just run them and "next, next, next" your way through the install wizards; the xming-tools package downloads as a zip archive, so extract it to somewhere on the path (eg: c:\windows\system32).
You will also need a terminal client like PuTTY so download that here, and we'll be ready to go.
We'll be covering two scenarios in this tutorial
Running Individual Applications
. Fire up your Xming server using the start menu shortcut. You will see the Xming icon running in your taskbar. If you hold your mouse pointer over the icon, you will see a popup indicating the server number for this instance (you can run multiple X servers).
There are only three basic steps required to achieve this.
- Configure Access Control on the Source Machine.
As with Linux, we will use the xhost utility to achieve this. The only difference is that this time you have to set the DISPLAY environment variable on the source machine too (this was done for you in Linux, because you were working within the X server environment).
set DISPLAY=:0.0
xhost +[hostname]:{X server number}
eg. xhost +192.192.0.5:0.0 - Make a Terminal Connection to the Target Machine.
Fire up PuTTY and use telnet or ssh to make a terminal (command line) connection to the machine you want to run the GUI application on. - Set the DISPLAY environment variable on the Target Machine.
The DISPLAY environment variable is used to choose the X server to attach to when running a GUI application. The variable is addressed as [X server hostname]:{X server instance number}. Set this variable to the hostname of your windows box (running Xming), and use the appropriate server instance number.
export DISPLAY=192.192.0.3:0.0
xclock to test with). Full Remote Desktop.
For this example, we'll be making use of Xming'sXlaunch component. But before we get started, we need to make sure that all the security is set up correctly.- Check Your Firewall.
Check your firewall on the target machine, ensure that the X11 port is open (usually port 6000). - Configure Your Desktop Manager.
If you're running Gnome, do the following:- Run the GDM configuration application (as root)
gksu gdmsetup - Select the Security tab and ensure that "Deny TCP connections to Xserver" is disabled. You will have to restart your X server after applying these settings. Just kill your X server (ctrl + alt + backspace), it should automatically restart.

- Run the GDM configuration application (as root)
- Fire up XLaunch.
Use the start menu shortcut to start XLaunch

- Select "One window"
- Enter a display number
- Select "next"
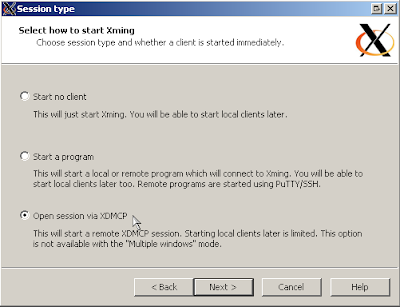
- Select "Open session via XDMCP"
- Select "next"

- Either select "Connect to host" and enter the hostname or ip address of the target machine.
- or, Select "search for hosts (broadcast)" to search for the target machine.
- Select "next"

- Accept the defaults and select "next"

- Select "Finsh"


You now have a full "Remote Desktop" Linux environment from within Windows!